The first time I made key lime pie ice cream, I oversweetened it. Badly. It tasted like lime-flavored sugar, not the punchy, lip-puckering tang that makes a real key lime pie worth eating. I scrapped the whole batch, went back to basics, and started treating it the way I treat an actual pie — balanced acidity, real lime zest, and a buttery graham cracker layer that stays crunchy even after freezing.
That’s the version I’m sharing with you today.
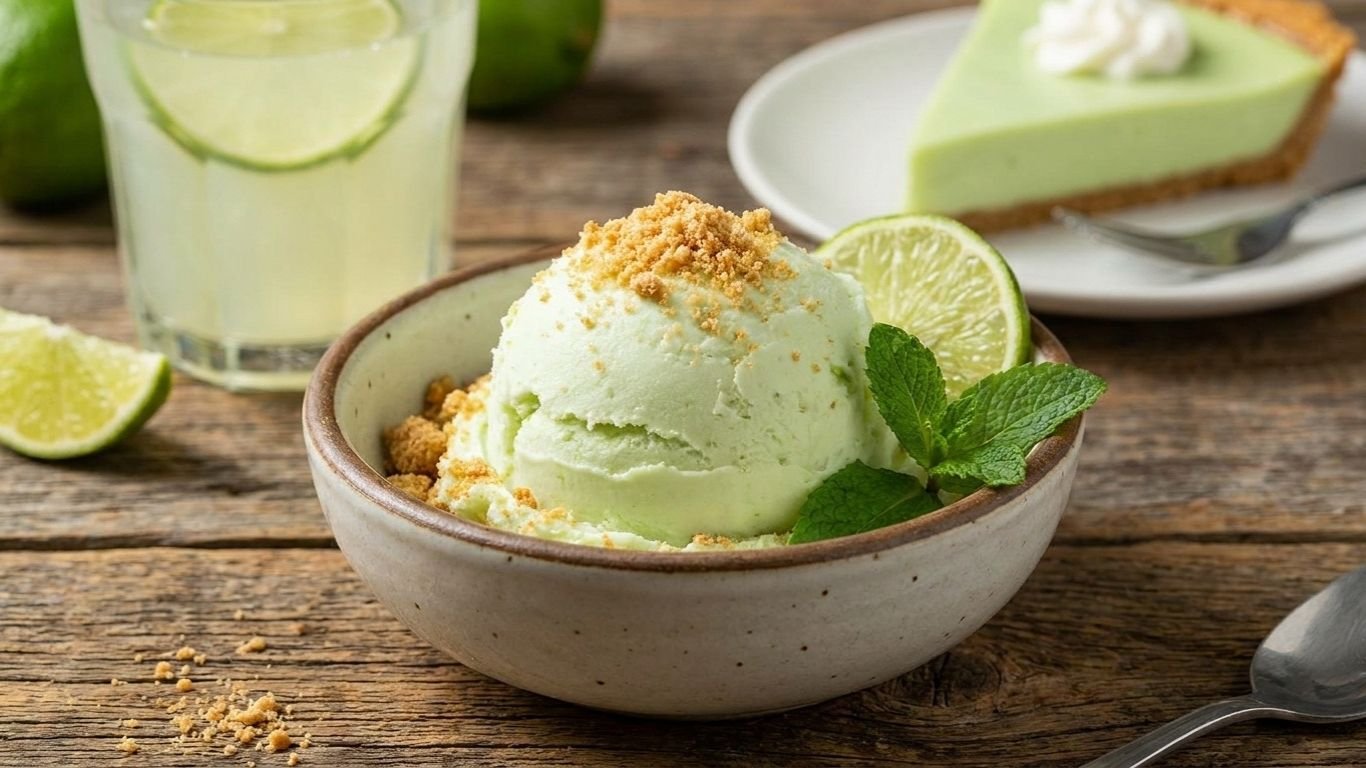
This is a no-churn key lime pie ice cream that genuinely tastes like someone scooped your favorite slice of key lime pie and froze it. You don’t need an ice cream maker. You don’t need any fancy equipment. You need a hand mixer, a loaf pan, and about 20 minutes of active time.
It’s perfect for summer cookouts, backyard parties, or honestly just a Tuesday night when it’s too hot to think. If you love a dessert that’s cold, creamy, aggressively citrusy, and has that satisfying crunch from a graham cracker swirl — you’re in the right place.
Why This Key Lime Pie Ice Cream Recipe Actually Works
There are dozens of versions of this floating around the internet. Here’s what makes this one different.
1. Fresh Lime Juice (and Zest) — Not Bottled
Bottled lime juice tastes flat and faintly chemical. Fresh key lime juice — or even regular Persian lime juice if you can’t find key limes — has a floral brightness that you simply cannot fake. The zest is non-negotiable. That’s where the aromatic oils live.
2. Sweetened Condensed Milk Does Double Duty
In no-churn ice cream, sweetened condensed milk replaces both the custard base and the added sugar. It also lowers the freezing point of the mixture, which is why no-churn ice cream scoops cleanly instead of turning into a rock-solid brick. I’ve tested this with coconut condensed milk too — works beautifully.
3. Whipping the Cream Cold Changes Everything
Warm heavy cream will not whip properly. I mean it — put your bowl and beaters in the freezer for 10 minutes before you start. Cold cream whips faster, holds its peaks longer, and creates a lighter, airier final texture. This is the single step most home cooks skip, and it’s the one that matters most.
4. The Graham Cracker Swirl Is Layered, Not Mixed
Folding graham crackers directly into the base turns them soggy within hours. Instead, I do a layered approach — ice cream base, crumble, base, crumble — so you get actual textural contrast in every bite. Toasting the crumbs in butter first locks in their crunch even longer.
5. A Pinch of Salt Cuts the Sweetness
Condensed milk is sweet. Really sweet. A quarter teaspoon of flaky salt in the graham cracker layer and a small pinch in the cream base keeps everything balanced and stops the whole thing from tipping into cloying territory.
Key Ingredients & Smart Substitutions
Heavy whipping cream (2 cups / 480ml): The fat content is what makes this whip up into a light, stable foam. Don’t use half-and-half or light cream — it won’t hold.
Sweetened condensed milk (1 can / 14 oz / 397g): The backbone of the no-churn method. For a dairy-free version, coconut sweetened condensed milk works perfectly and adds a subtle tropical note.
Fresh key lime juice (⅓ cup / 80ml): Key limes are smaller, more aromatic, and slightly more bitter than Persian limes — that bitterness is part of the pie’s character. Persian limes work as a swap if needed.
Key lime zest (2 tablespoons): Don’t skip this. Zest carries 5x the flavor of juice. Zest before you juice — always.
Graham crackers (8 full sheets / about 130g): For the crumble layer. Use gluten-free graham crackers for a GF version; they behave identically.
Unsalted butter (3 tablespoons / 43g): Binds the crumble and helps it crisp up when toasted. Vegan butter works here.
Flaky sea salt (¼ teaspoon): Balances the sweetness. Regular kosher salt works too — just use a slightly smaller pinch.
Cream cheese (4 oz / 113g, softened): My secret weapon. A small amount whipped into the base gives the ice cream that authentic cheesecake-adjacent tang of a real key lime pie filling. It also helps the base stay creamy and scoopable.
Step-by-Step Instructions
Step 1: Make the Toasted Graham Cracker Crumble
Crush 8 graham cracker sheets into coarse crumbs — you want some pea-sized chunks, not fine powder. Melt 3 tablespoons of butter in a skillet over medium heat, add the crumbs and a pinch of salt, and stir constantly for 3–4 minutes until they’re golden, fragrant, and smell like toasted biscuits.
Spread them on a plate and let them cool completely. Warm crumble will melt your ice cream base, so don’t rush this.
Chef’s Note: Don’t pulverize the crackers to dust. Larger chunks give you those satisfying crunchy bites in the finished ice cream.
Step 2: Whip the Cream
Put your metal mixing bowl and beater attachments in the freezer for 10 minutes. Pour in 2 cups of cold heavy cream and beat on medium-high until you get firm, glossy peaks. This takes about 3–4 minutes. Set aside.
Chef’s Note: Stop before the cream looks grainy — that means you’ve gone too far and it’s heading toward butter.
Step 3: Make the Lime Base
In a large bowl, beat the softened cream cheese until smooth with no lumps — about 1 minute. Add the full can of sweetened condensed milk, the key lime juice, and all the lime zest. Mix until completely smooth and combined. It’ll smell incredible at this point. Bright, tart, a little floral.
Step 4: Fold Together
Add one-third of the whipped cream to the lime base and stir it in firmly — this lightens the base and makes folding easier. Then gently fold in the remaining whipped cream in two additions, using a wide spatula and slow, deliberate strokes. You want to keep as much air in there as possible.
Chef’s Note: Folding is not stirring. If you stir aggressively, you’ll deflate the cream and end up with a denser, icier result.
Step 5: Layer & Freeze
Pour half the ice cream base into a 9×5 inch (23x13cm) loaf pan. Sprinkle half the graham cracker crumble over the top in an even layer. Add the remaining ice cream base, smooth the top with a spatula, then scatter the rest of the crumble over the surface.
Lay a piece of plastic wrap directly on the surface — this prevents ice crystals from forming — then cover the pan with foil or a lid.
Freeze for a minimum of 6 hours, but overnight is best.
Step 6: Scoop & Serve
Pull the pan from the freezer and let it sit on the counter for 5 minutes before scooping. This is the difference between struggling with a spoon and getting those perfect, clean scoops.
Garnish with extra lime zest, a wedge of fresh key lime, or a light drizzle of honey. Serve immediately.
Troubleshooting & FAQs
Q: My ice cream came out icy and grainy, not creamy. What happened?
Almost always, this comes down to the cream not being whipped to firm peaks before folding. Soft, under-whipped cream doesn’t hold enough air. Make sure your peaks hold their shape — they should look like fluffy clouds, not barely-there ripples. Also double-check that you’re using heavy whipping cream, not light cream.
Q: It’s too sweet for me. How do I fix that?
Add more lime juice or zest — acidity is the natural counterbalance to sweetness. You can also increase the cream cheese to 6 oz (170g) for more tanginess. A touch more flaky salt in the base also dials sweetness back without you noticing the salt itself.
Q: Can I use an ice cream maker instead?
Absolutely. Follow steps 2–4 to make the base (you can skip whipping the cream separately since the machine handles aeration). Churn according to your machine’s instructions, then fold in the crumble during the last 2 minutes of churning. Transfer to a container and freeze until firm.
Q: Can I make this without cream cheese?
Yes — you can omit it. The ice cream will still be delicious, just slightly less tangy and a little softer in texture. If you want that tanginess without cream cheese, add 2 tablespoons of full-fat sour cream to the base instead.
Storage, Make-Ahead & Serving Tips
Storage: Covered tightly with plastic wrap pressed directly against the surface, this keeps well in the freezer for up to 3 weeks. After that, ice crystals start to form more aggressively and the texture suffers.
Make-Ahead: This is genuinely one of the best make-ahead desserts I know. Make it 1–2 days before your event, keep it in the freezer, and it’ll be in perfect condition. The graham cracker layers actually improve slightly after 24 hours as they absorb just a touch of moisture.
Serving from frozen: Always let it sit for 5 minutes at room temperature before scooping. If your kitchen is very hot, 3 minutes is plenty. Don’t microwave it — you’ll melt the edges while the center stays solid.
Fun serving ideas:
- Scoop it into a pre-made mini graham cracker tart shell for an individual “pie”
- Layer it in a glass with extra crumble for a key lime ice cream parfait
- Sandwich between two graham crackers for an ice cream sandwich situation that’ll change your life